The procedures in this article are accessed by clicking

and then Configuration, then clicking the name of your configuration.
Go to the
Personalization tab to configure languages, visitor types, and data fields for the iLobby application.

Configuring App Languages
Languages are displayed on the Welcome screen of the iLobby application, allowing visitors to sign in using the selected language.

1. To select the
App Languages that will be shown on the main screen of the device, click on

2. In the pop-up window, you will see lists of languages. Languages with checkmarks in the upper part of the screen are currently enabled languages.

3. To add a new language, check the box next to the appropriate language from the second part of the screen below the line. Once enabled, it will be moved to the upper part of the screen.
4. To change the order in which the languages are displayed on the device, drag and drop them into the correct order. The first language in the list is the default one.

New languages become available regularly, based on customer requests.
Configuring Visitor Types
Visitor Types allow you to add specific types of visitor categories. Each category can be configured to follow a unique logical flow with its own requirements for data collection.
To configure visitor types:
1. Click

below the list of existing types. You see a list of existing visitor types.

Add from predefined types
2. Click on the
Please select box and select one of the pre-defined visitor types (these represent the most common types of visitors).

Create new visitor type
3. If you don’t see the type you are looking for in the predefined list, click on
Create new visitor type. The new visitor type window will appear.

4. Enter the visitor type's
Title: this is the name of the visitor type in the portal.
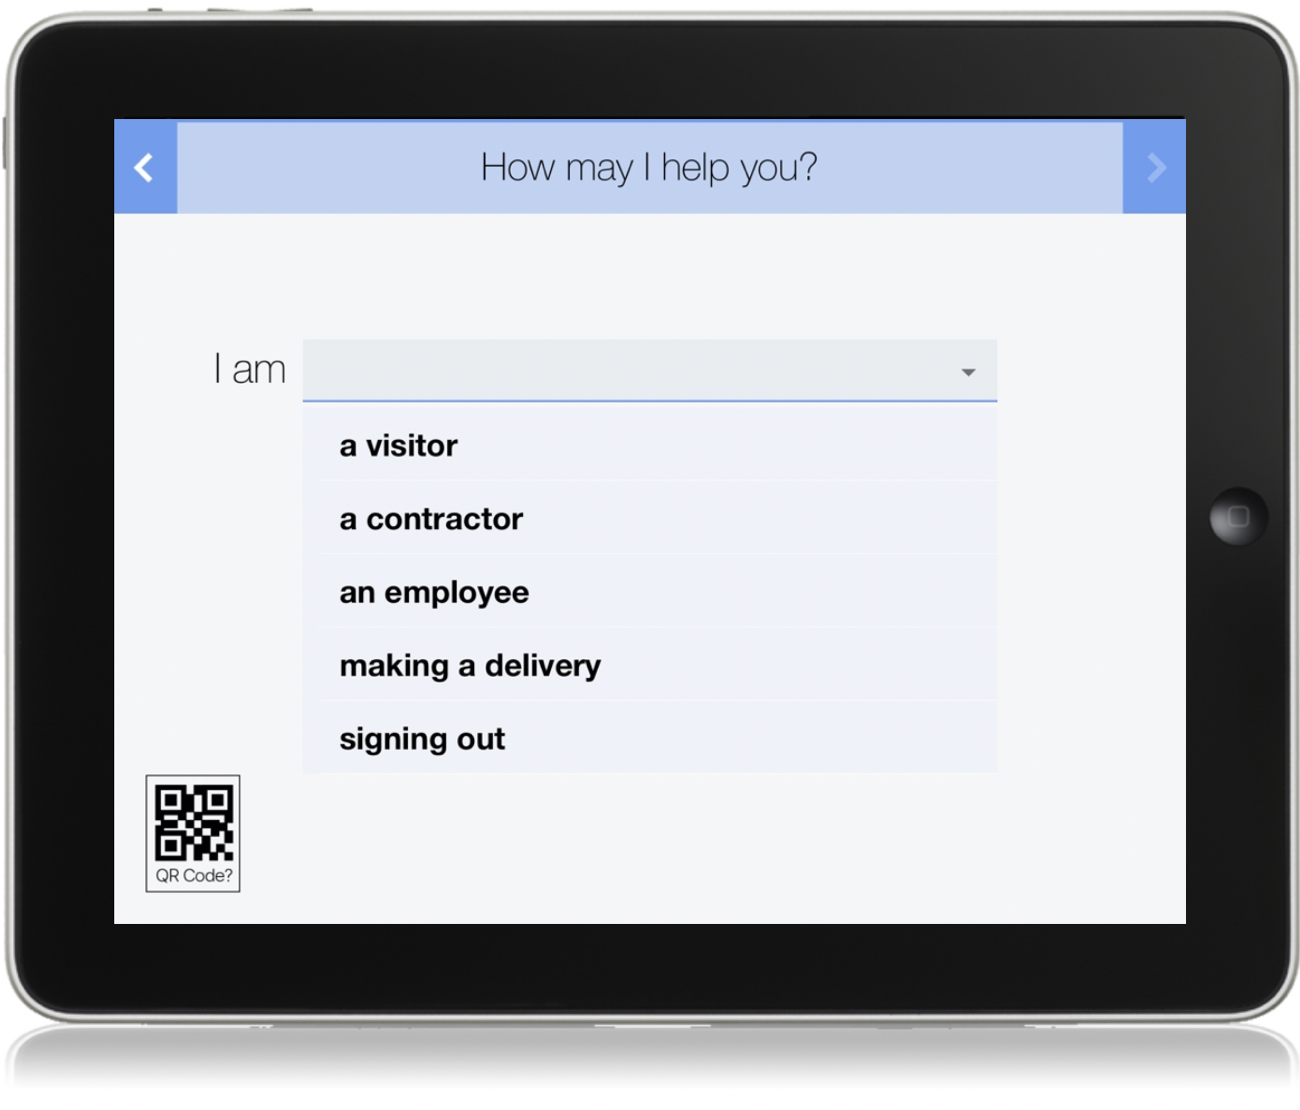
5. Enter the text under
Screen Label that should show on the app How may I help you? screen. The text will be shown after "I am...". For example, "a contractor", "making a delivery", etc.
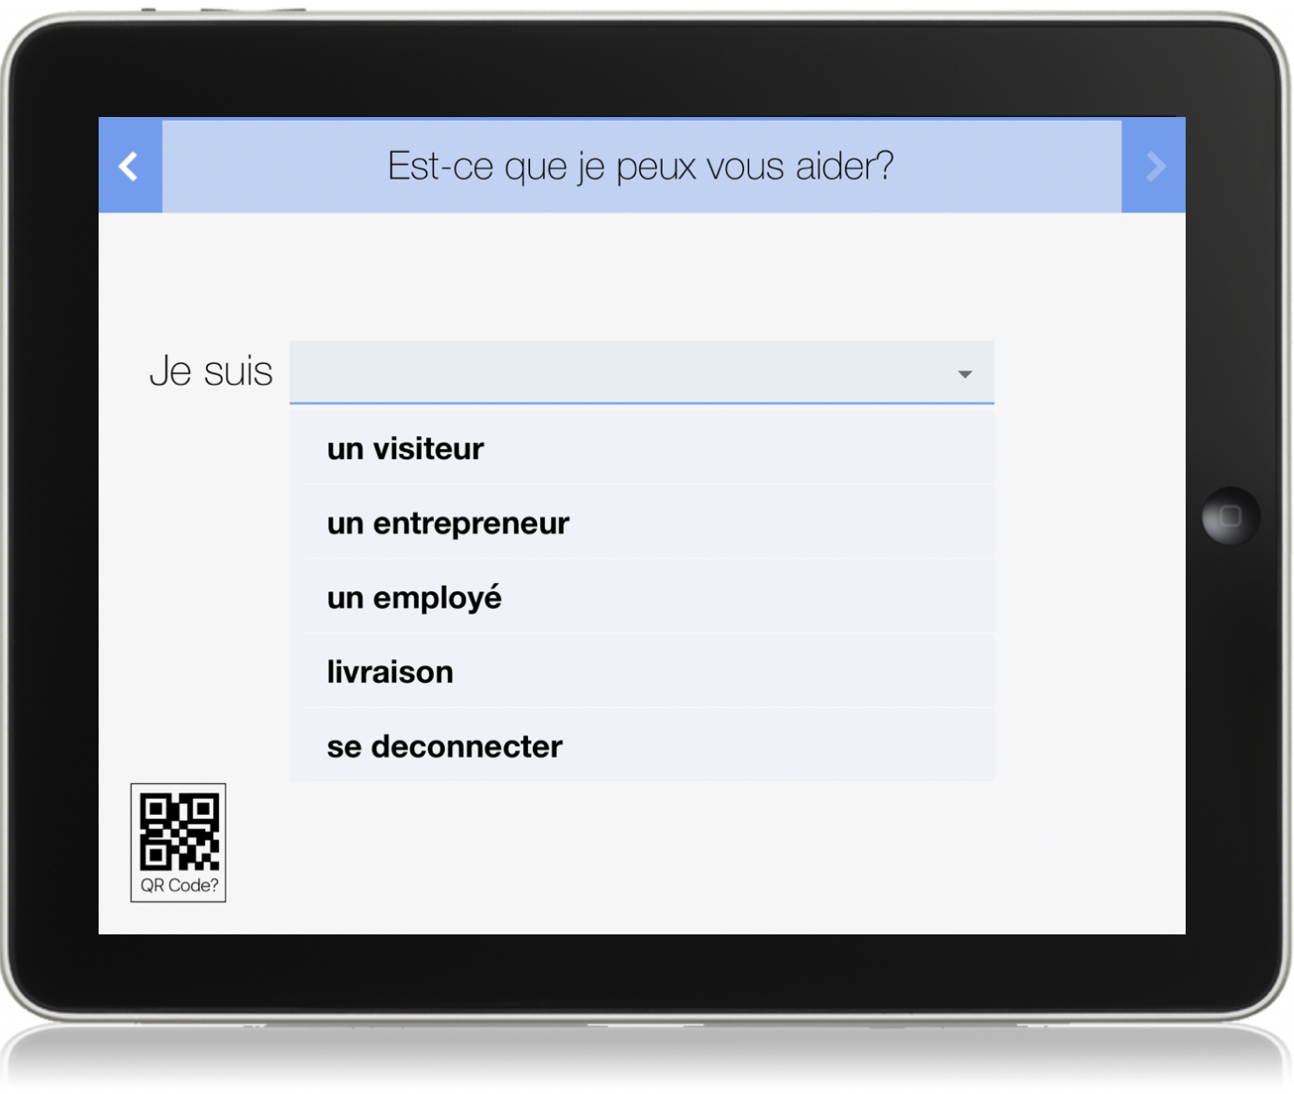
6. If more than one language is enabled for your account, you can localize the screen text labels: select the appropriate language from the list (languages are represented by flags).
The English text is translated into the appropriate language: if necessary, you can adjust the translated text and add a screen label for each language. On the screenshot below, you can see the example of localization to French.

It will look the following way on the iPad screen:
7. To have a specific host notified whenever someone of this visitor type arrives, enable Auto-assign host, click on N/A, and select the appropriate host.

This will also remove the
Who are you visiting? screen for this visitor type from the sign-in process.
8. Toggling the
Hide on device option for a visitor type will make it available for pre-registration for authorized employees only. Visitor types like this will be invisible on the
How may I help you? screen for visitors.
9. To change the order of how the visitor types are displayed on the iLobby app, click on the three lines icon

, drag, and drop to new locations.

10. To edit a visitor type, click on

to the right.
11. To delete a visitor type, click on the

next to it.
Adding Data Fields
The purpose of data fields is in getting visitors’ personal information. Data fields are displayed on the Tell us about yourself screen.

By default, visitors of any type are prompted for their
Full Name and
Company.
If you’d like to add unique fields for a visitor type:
1. Click on

to open
Data Fields window.

2. There are two options to add data fields:
· Add from Library
Clicking on Please Select will reveal the list of data fields that are frequently requested by customers.

· Create new data field
If you didn’t find the requested field in the library, you can create a new one.

3. Enter the data field text under
Screen Label.
4. We can localize labels to the languages enabled for the site by clicking on the image of a flag to the right of the label.
5. By checking
Is Mandatory, we can make the field mandatory to be filled in. If unchecked, the field remains optional.
On the
Tell us about yourself screen, mandatory fields will be marked with a red asterisk.

6. Under Control type, we can change the type of field to:

· By default, the control type is set to
Text box. This field type allows visitors to enter the requested data by typing it in on the iPad.
·
Dropdown List for the visitors to select between the options. Usually, when customers request to add this type of field to their sign-in flow, they provide selections to add to the list.

To add a dropdown option, click on
New Item, enter the option, click on

To change the order of the dropdown selections, use arrows

to move them.
To sort the selections in alphabetical order, click on Sort items (A-Z).
To delete a dropdown option, click on

next to it.
·
Country Picker for visitors to select their country from the list. The list of countries is added automatically.
·
Country Picker (U.S. on top) for visitors to select their country from the same automated list, but the U.S. will be at the beginning of this list.
·
Date Picker for visitors to select the date from the list. The date picker is represented by three columns on the iPad making it possible to select a date, a month, and a year.
·
Time Picker for visitors to select the date from the list. The date picker is represented by two columns (hours and minutes) on the iPad making it possible to select the time.
When data fields are localized to a different language, selections from the Dropdown list, Country picker, Date picker, and Time picker are not localized. Currently, they are only available in English.
7. To enable the data field for certain visitor types, toggle Restrict by visitor type to On and select these visitor types.

8. If you toggle the Hide On Device option, it will make the field available only for authorized users (hosts) when they invite visitors to events for internal purposes, and invisible for visitors on the kiosk and during pre-registration online.

In the window, when inviting a guest by email, this field will have (Internal) next to it.

Afterwards, this information can be viewed under the
Visitor Tab.

9. If you enabled
Not for reuse at the list for one field, returning visitors will be prompted to fill this field in every following visit. It will be blank, while the other fields will be pre-filled with the data collected during previous visits.
The Not for reuse option is not available for the following data fields:
Full Name
First Name
Last Name
Email Address
Company
It was disabled for these fields because this visitor’s data doesn’t change that often.
10. To edit a data field, click on

next to it.
11. To disable the field without deleting it, uncheck the checkbox to the left of it.

12. To delete a field click on

next to it.
13. To change the order of the fields, click on the three lines icon

next to the field, drag it, and drop to the right position.

14. For environments with multiple sites, to apply the change for all sites, check the box
Apply to all sites with default settings.

If you leave it unchecked, the changes will be applied to the current site only.