Configuring Notifications
The procedures in this article are accessed by clicking and then Configuration, then clicking the name of your configuration.
Use the Notifications tab to:
- set up automated notifications for system events (including who should receive them)
- configure the interval at which hosts are notified (via email) if visitors have not signed out (hosts can sign such visitors out).
- configure when you want to receive system-generated reports
Available Reports
Configuring End of Day Summary Report
The
End of Day Summary shows the number of visitors who signed in during the day, with their details and the top five hosts of the day.
1. Enable End of Day Summary. Click
Configure

2. Select the parties who should receive the report.
3. Select the time at which the summary should be sent each day.
4. Select the type of email attachment. The list of visitors will be attached to the email report in this format
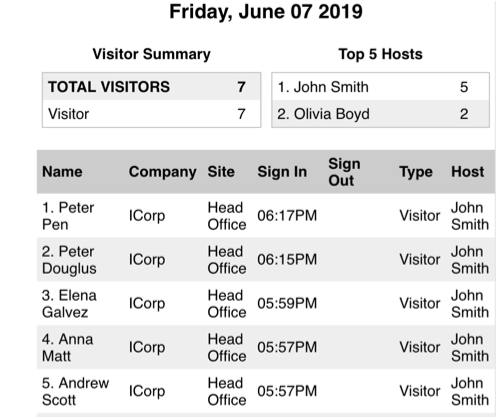
Sample End of Day Summary Report
Configuring End of Week Summary Report
1. Enable
End of Week Summary. Click
Configure.
2. Select the parties who should receive the report.
3. Select the period when the summary will be sent.
The system will send the report the following day after the week ends.
- Monday - Friday. The report for this selection will be sent on Saturday. This report will also include visitors, if there were any, from Saturday and Sunday before this week.
- Monday - Sunday. The report for this selection will be sent on Monday.
4. Select the type of email attachment. The list of visitors will be attached to the email report in this format
Configuring End of Month Report
The End of Month Summary shows a list of the visitors who signed in during the month, a list of the top 5 hosts of the month (the 5 hosts who had the most visitors that month and a link to a CSV file listing all visitors for the month.)
1. Enable
End of Month Summary. Click
Configure

2. Select the parties who should receive the report.
3. Select the type of email attachment. The list of visitors will be attached to the email report in this format.
Configuring Signed-in Visitors Report
The Signed-in Visitors Report lists the currently signed-in visitors.

Tip: These reports show data for the current day. To produce a report for a different date range, use the Visitors tab and filter by the desired date range.
1. Enable Signed-in Visitors Report. Click Configure.
2. Select the parties who should receive the report.
3. Set the Notification Time (s) for the report, which can be generated at half-hour intervals.
Available notifications
Configuring Sign Out Notifications
To send an email notifying hosts when their visitors sign out, enable
Sign Out Notifications.
1. By default, the email notification is disabled. Toggle it to On. The system email template will be displayed.
2. [HOST_NAME], [VISITOR_NAME], and [VISIT_END] are placeholders that will be replaced with the corresponding data about the visit in the email notification.
Configuring Offline Device Notifications
To notify selected parties if the device goes offline for any reason:
1. Enable
Offline Device Notifications. Click
Configure

2. Select the parties who should be notified.
3. Set the Notification at which you’d like those parties to be notified.
Configuring Visitor Sign-out Reminder
To email the host if a visitor has not signed out once the defined
Default Visit Duration has elapsed:
1. Enable
Visitor Sign-out Reminder, click
Configure.
2. Select the parties (Host, Visitor) who should be notified by checking the option.
3. Set the Notify host after (this applies to all hosts). It is possible to set multiple options here, for example, reminders can be set to be sent after 1 hour, after 2 hours, after 3 hours etc.
The email includes a link the host can use to sign the visitor out:
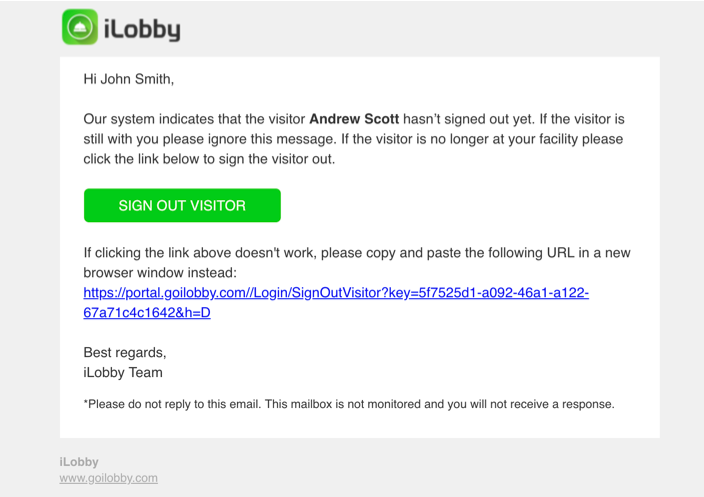
Visitor Sign-out Reminder
Available Parties
Reports and notifications can be automatically sent via email to one, some or all of the following parties:
- Account admin (users with the Account Administrator role)
- System Assistant (hosts set, on the General tab, as a system assistant for the site)
- Other (email address you specify; if more than one, separate each email with commas).
Reports can also be downloaded, in CSV format, from the Visitor Log. Refer to
the Working with Visitor records
article.
Preferences
Preferences set the default app language and preferred time format for event invitations.
Preferred Language is
set automatically in these settings. The system takes the language which is set as first for
App Languages
under the
Personalization
tab. If you'd like to change it, click on the field and select the correct language and hit Save.
Preferred time format is the format of time used in event invitations. You can select between the following formats:
Underneath this setting, there are examples of how the long and short date and time formats will look like.
English (United States)
English (Europe)
Related Articles
Configuring Events
This feature allows hosts to invite guests, via email, to visit them at a specific site and at a specific time: this speeds up the sign-in process. You can configure events for either multiple guests or a single guest. Configuring Multi-Guest Event ...Configuring General Settings
1. Click , then Configuration, then the name of your configuration. 2. On the General tab, enter the Site Name: this is used in notifications sent to hosts; e.g., “You have a visitor waiting for you at <Site Name>.” 3. Select the Time Zone in which ...Configuring the Address Book
In order for guests to be able to select a host on the iLobby app, and for the hosts to be notified of a visitor, the iLobby Address Book needs to be populated with host (employee) profiles. You can add or edit profiles as necessary. Each host's ...Configuring Device Appearance and Behaviour
You can configure the look and feel of the iLobby application on devices. Click , then Configuration. You see a list of sites available for configuration. A site is a physical place (office) to which visitors come. If you have multiple offices, you ...Slack Notifications
This feature requires the Slack addon to be enabled on your account. Please speak with your iLobby account representative before proceeding. Enable Slack notifications in iLobby With iLobby, you can use Slack for visitor notifications. Learn how to ...